A gallery wall is one of the most personal design statements a room can make. Done well, it reads as a reflection of the person who lives there — layered, idiosyncratic, collected over time. Done poorly, it reads as a collection of frames arranged by someone who couldn’t commit to a single piece.
The difference is process. Here’s how to do it properly.
Step 1: Choose Your Wall
Not every wall is a gallery wall candidate. The best gallery walls are on walls you see from a seated position — the wall the sofa backs up to, the wall opposite the dining table, the wall at the end of a hallway. Walls that you pass by without pausing get less visual attention than the ones you sit and look at.
The wall should be relatively uninterrupted — minimal doors, windows, or switches breaking the surface. A clean, large wall gives the arrangement room to breathe. A wall crowded with architecture competing for attention makes the gallery look cluttered even before you hang anything.
Step 2: Define the Boundary
Before choosing a single piece, decide the outer boundaries of the arrangement: how wide, how tall, how far from the ceiling, from the floor, from adjacent walls. This decision shapes everything that follows.
A useful rule: the outer boundary of the arrangement should be roughly proportional to the wall — approximately two-thirds the width of the wall, with the center of the arrangement at approximately 57–60 inches from the floor (standard gallery height).
Mark the boundary corners lightly on the wall with pencil, or use painter’s tape to outline the arrangement’s footprint. This gives you a container to work within and prevents the arrangement from growing asymmetrically as you hang.
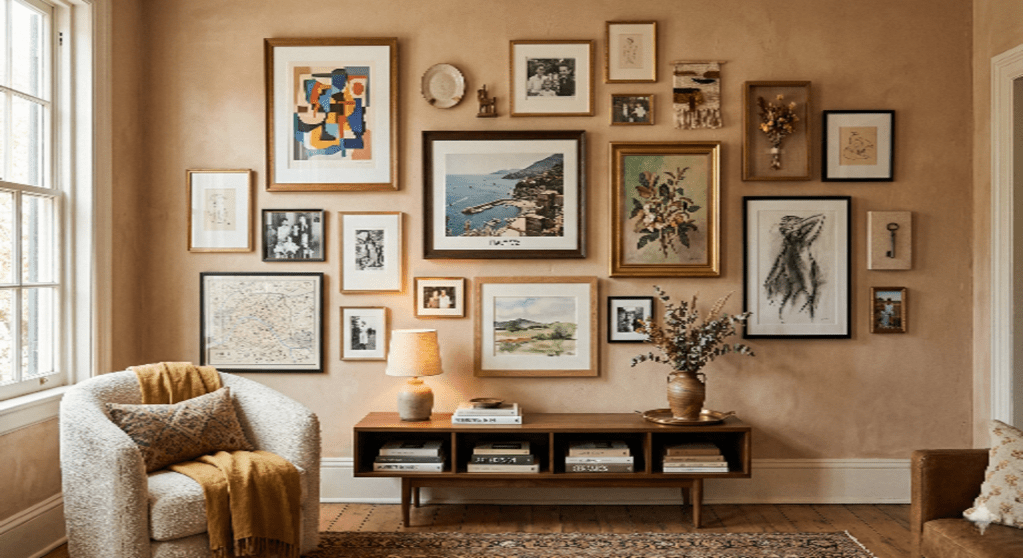
Step 3: Choose Your Anchor Piece
Every successful gallery wall has an anchor — a piece significantly larger than the others that establishes the arrangement’s visual center of gravity. The anchor is typically positioned near but not exactly at the center of the arrangement, offset slightly to one side or above the midpoint.
The anchor should be the strongest piece in the arrangement: the one you’d keep if you could only keep one. Everything else is built around it.
Step 4: Mix What You’re Putting In
The arrangements that work well contain a mix: framed art prints and framed photos, but also objects — a small mirror, a ceramic wall-mounted piece, a textile hanging, a small shelf with one thing on it. This material variation is what prevents a gallery wall from looking like a frame display and makes it look like a collection.
A reliable mix: three to five framed pieces (art prints, photographs, or a combination), one mirror, one or two non-framed elements (a woven piece, a ceramic, a mounted object). The non-framed elements provide material contrast that makes the framed pieces look more intentional.
Step 5: Work It Out on the Floor First
Before touching the wall, arrange everything on the floor in the approximate footprint of your boundary. Move pieces around until the arrangement feels balanced — not symmetrical, but balanced. Large pieces distributed, variety in frame size across the arrangement, the anchor piece positioned where it will be strongest.
Photograph the floor arrangement from above. This is your reference when you hang.
Step 6: Frame Consistently, Vary the Content
The most common gallery wall mistake is using too many different frame styles and colors. A mix of gold, black, wood, and white frames reads as chaotic. Choose one or two frame finishes — one primary (black, brass, or natural wood are the most versatile) and one secondary — and stick to them across the arrangement.
The variation should come from the art, not the frames. Consistent framing makes the art feel curated; inconsistent framing makes it feel like miscellaneous frames found at different times.
Step 7: Hang from the Anchor Out
Start with the anchor piece, hang it exactly where you want it, and work outward from there. Don’t start from a corner and work across — the arrangement will drift in that direction and the visual balance will be off.
After the anchor, add the next largest piece, then work outward with progressively smaller pieces. Maintain 2–3 inches of space between frames — enough to read each piece individually, close enough to read as a single arrangement.
Practical Hanging Tips
Paper templates. Trace each frame onto paper, cut out the template, and tape the templates to the wall before drilling. This lets you see the full arrangement in place before making any holes. Adjust until it’s right, then drill through the paper.
Level is optional. Gallery walls with every frame perfectly level look corporate. Gallery walls where most frames are level but a few are slightly off look collected. Choose your preference intentionally rather than accidentally.
Command strips for small frames. 3M Command picture strips rated for the frame weight remove cleanly from most wall surfaces. For heavier frames and mirrors, find studs.
The Edit After Hanging
Once everything is up, live with it for a week before deciding it’s done. The pieces that bother you after a week probably need to be replaced or removed. The ones you’re still happy with after a week are right.
A gallery wall isn’t finished when you hang the last frame. It’s finished when the combination feels genuinely like yours.

Leave a comment